Zend OPcache
Bytecode caches are not new to PHP. We’ve had optional standalone extensions like Alternative PHP Cache (APC), eAccelerator, ionCube, and XCache. But none of these was built into the PHP code distribution until now. As of PHP 5.5.0, PHP has its own built-in bytecode cache called Zend OPCache.
First, let me explain what a bytecode cache is and why it is important. PHP is an interpreted language. When the PHP interpreter executes a PHP script, the interpreter parses the PHP script code, compiles the PHP code into a set of existing Zend Opcodes (machine-code instructions), and executes the bytecode. This happens for each PHP file during every request. This is a lot of overhead, especially if PHP must parse, compile, and execute PHP scripts over and over again for every HTTP request. If only there were a way to cache precompiled bytecode to reduce application response times and reduce stress on our system resources. You’re in luck.
A bytecode cache stores precompiled PHP bytecode. This means the PHP interpreter does not need to read, parse, and compile PHP code on every request. Instead, the PHP interpreter can read the precompiled bytecode from memory and execute it immediately. This is a huge timesaver and can drastically improve applications performance.
Enable Zend OPcache
Zend OPcache isn’t enabled by default; you must explicitly enable Zend OPcache when you compile PHP.
- If you choose a shared web hosting, be sure you choose a good hosting company that provides PHP 5.5.0 or newer with Zend OPcache enabled.
- If you compile PHP yourself (i.e. on a VPS or dedicated server), you must include this option in your PHP ./configure command:
- –enable-opcache
- After you compile PHP, you must also specify the path to the Zend OPcache extension in your php.ini file with this line:
- zend_extension=/path/to/opcache.so
The Zend OPcache extension file path is displayed immediately after PHP compiles successfully. If you forget to look for this as I often do, you can also find the PHP extension directory with this command:
php-config –extension-dir
After you update the php.ini file, restart PHP process and you’re ready to go. You can confirm Zend OPcache is working correctly by creating a PHP file with this content:
<?php phpinfo(); ?>
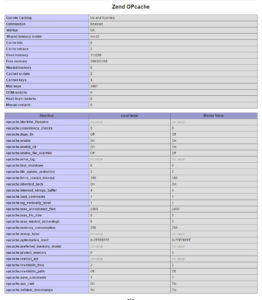
View the PHP file in a web browser and scroll down until you see the Zend OPcache extension section shown as below. If you don’t see this section, Zend OPcache is not running.

Configure Zend OPcache
When Zend OPcache is enabled, you should configure the Zend OPcache settings in your php.ini configuration file. Here are the OPcache settings I like to use:
opcache.validate_timestamps = 1
opcache.revalidate_freq = 0
opcache.memory_consumption = 64
opcache.interned_strings_buffer = 16
opcache.max_accelerated_files = 4000
opcache.fast_shutdown = 1
You can find a complete list of Zend OPcache settings at PHP.net.
Below is a tutorial video for XAMPP OPcache configuration:
Use Zend OPcache
This part is easy because the Zend OPcache works automatically when enabled. Zend OPcache automatically caches precompiled PHP bytecode in memory and executes the bytecode if available.


